A Simple AWS Setup with Terraform
A step-by-step guide to deploying a VPC, EC2, and S3 on AWS using Terraform.
This post details my process of provisioning a basic AWS environment using Terraform, a tool I applied to manage a VPC, subnet, EC2 instance, and S3 bucket. Drawing on my experience with AWS and GCP, I documented the steps and challenges to demonstrate Infrastructure as Code in a familiar cloud setting.
Setting Up the Prerequisites
I started by installing Terraform and the AWS CLI, then configured AWS credentials with a dedicated IAM user.
Install Terraform:
- Visit https://developer.hashicorp.com/terraform/install.
- Download the binary for your OS (e.g., macOS, Windows).
- Unzip the file and move it to a directory in your PATH:
- macOS/Linux:
sudo mv terraform /usr/local/bin/(ensure/usr/local/binis in your PATH). - Windows: Add to
C:\Program Filesand update PATH in System Settings.
- macOS/Linux:
- Verify the installation:
terraform --version(e.g., v1.9.x as of April 2025).
Install and Configure AWS CLI
Install the AWS CLI from https://aws.amazon.com/cli/, then configure it:
1
2
aws configure
# Enter Access Key, Secret Key, region (e.g., us-west-2), output (json)
Using an existing AWS account, I created an IAM user (terraform-demo-user) for Terraform to manage resources like EC2 and S3. Initial runs failed with “Access Denied” errors due to missing permissions. I resolved this by defining a minimal policy, following the principle of least privilege.
AWS error messages (e.g.,
not authorized to perform: s3:GetBucketAcl) indicate missing permissions—start with basic access and adjust as needed. For production, avoid storing Access Keys in plain text; use IAM roles or AWS Secrets Manager instead.
Writing the Terraform Configuration
I created a GitHub repository (terraform-aws-demo) and defined the resources in main.tf:
1
2
3
4
5
6
7
8
9
10
11
12
13
14
15
16
17
18
19
20
21
22
23
24
25
26
27
28
29
30
31
32
33
34
35
36
37
provider "aws" {
  region = "us-west-2"
}

resource "aws_vpc" "main" {
  cidr_block = "10.0.0.0/16"
  tags = {
    Name = "demo-vpc"
  }
}

resource "aws_subnet" "public" {
  vpc_id     = aws_vpc.main.id
  cidr_block = "10.0.1.0/24"
}

resource "aws_instance" "web" {
  ami           = "ami-0c2ab3d2efb3b2f5" # Amazon Linux 2, us-west-2
  instance_type = "t2.micro"
  subnet_id     = aws_subnet.public.id
  tags = {
    Name = "demo-web"
  }
}

resource "aws_s3_bucket" "storage" {
  bucket = "my-demo-bucket-${random_string.suffix.result}"
  tags = {
    Name = "demo-bucket"
  }
}

resource "random_string" "suffix" {
  length  = 8
  special = false
  upper   = false
}
This configuration a VPC (10.0.0.0/16), a public subnet (10.0.1.0/24), an EC2 instance (t2.micro), and an S3 bucket with a random suffix.
Applying the Infrastructure
I deployed the resources using these commands:
1
2
3
terraform init
terraform plan -out=plan.tfplan
terraform apply "plan.tfplan"
Save the plan file
terraform plan -out=plan.tfplanto ensure the reviewed plan matches what’s applied, reducing the risk of errors.
The first terraform apply failed due to an invalid AMI ID (ami-0c55b159cbfafe1f0). I had to update it to a valid Amazon Linux 2 AMI for us-west-2 (ami-0c2ab3d2efb3b2f5). The S3 bucket name also failed validation due to uppercase characters in the random suffix, so I set upper = false in the random_string resource.
Visualizing the Architecture
To better understand my setup, I created an architecture diagram using draw.io. The diagram shows the VPC, public subnet, EC2 instance, and S3 bucket, with an Internet Gateway to enable public access to S3:
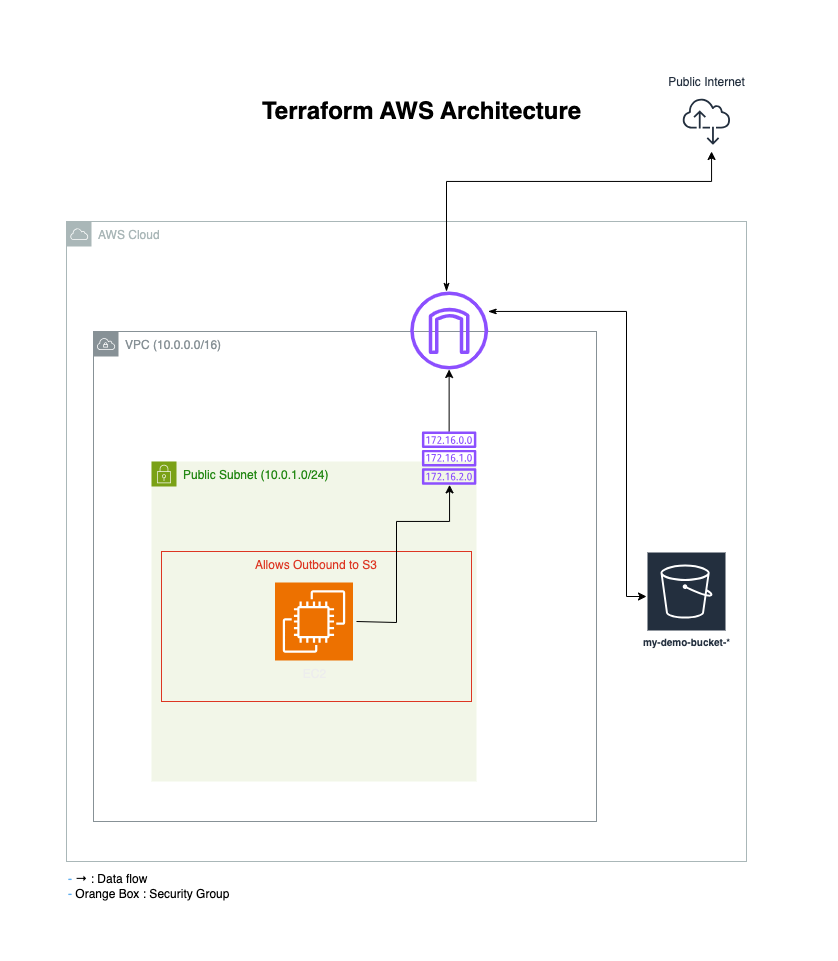 Terraform-Generated AWS Cloud Infrastructure Diagram
Cleaning Up
I removed the resources to avoid AWS charges:
1
terraform destroy
Always run
terraform destroyafter testing to prevent unexpected costs, especially with cloud resources.
Conclusion
This Terraform project provided a straightforward way to apply Infrastructure as Code on AWS. Addressing issues like AMI IDs and S3 naming refined my approach to provisioning cloud resources. It’s a useful exercise for exploring DevOps and SRE workflows in a controlled setup.